How to Build the Firestorm Viewer from source code on ArcoLinux in 2024.

Preface:

It’s been a “few” years since I made the post about building the Firestorm Viewer on Ubuntu back in 2011.

(I did pretty much step out of SL sometime about 2015 for the most part after a good SL friend stepped away to start an RL family.)

“ForestAurora” is a pseudonym, my real SecondLife name was quite well known among the RLV community circa 2009.

I decided recently to take a look on SecondLife again to see what’s changed.


I use Linux 95% of the time, specifically Arch-based distros, and I noticed the info online mostly referred to building Secondlife/Firestorm viewers for Ubuntu LTS versions.

After some digging online in a blog post at http://www.xenh.at/, I managed to find what libraries were required for compiling Firestorm 64-bit on ArcoLinux.

I was inspired to make this new guide after stumbling across the blog of someone I used to know in SL: https://beccapet.com/ (Hi Becca)


Getting ArcoLinux

Arch-based distros are “bleeding-edge” so often receive updates daily.

There are several Arch-based distros, but ArcoLinux (Plasma/KDE edition) is currently my favourite so here is my guide:

Please note: I have proof tested my guide on a “bare metal” (native ArcoLinux install) system, and in a “virtual machine”, and it crashed the terminal app during compiling for some reason on the “virtual machine” (your mileage may vary),

so I can only recommend following my guide on “bare metal” systems.

Download the distro from here:

https://sourceforge.net/projects/arcolinux-community-editions/files/plasma/arcolinuxb-plasma-v24.02.04-x86_64.iso/download

You can use Balena-Etcher software to burn the ISO onto a USB-stick:

https://etcher.balena.io

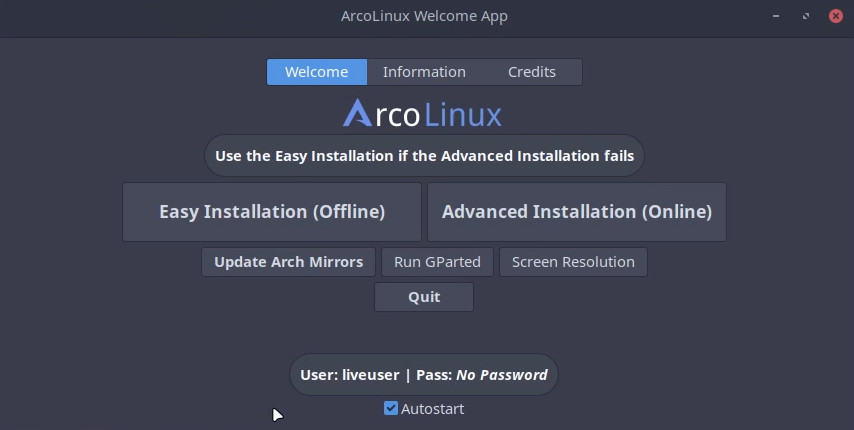
The installer has quite a comprehensive list of apps that can be installed as part of the install process, but for the purpose of this guide I suggest selecting the “Easy Installation (Offline)” option.

Once installed, open Terminal/Konsole and type:

archlinux-tweak-tool

Once ArchLinux-Tweak-Tool is opened, click the “Pacman” tab on the left,

and at the bottom of the window click the checkbox next to “Enable Chaotics repo – set as last repo”.

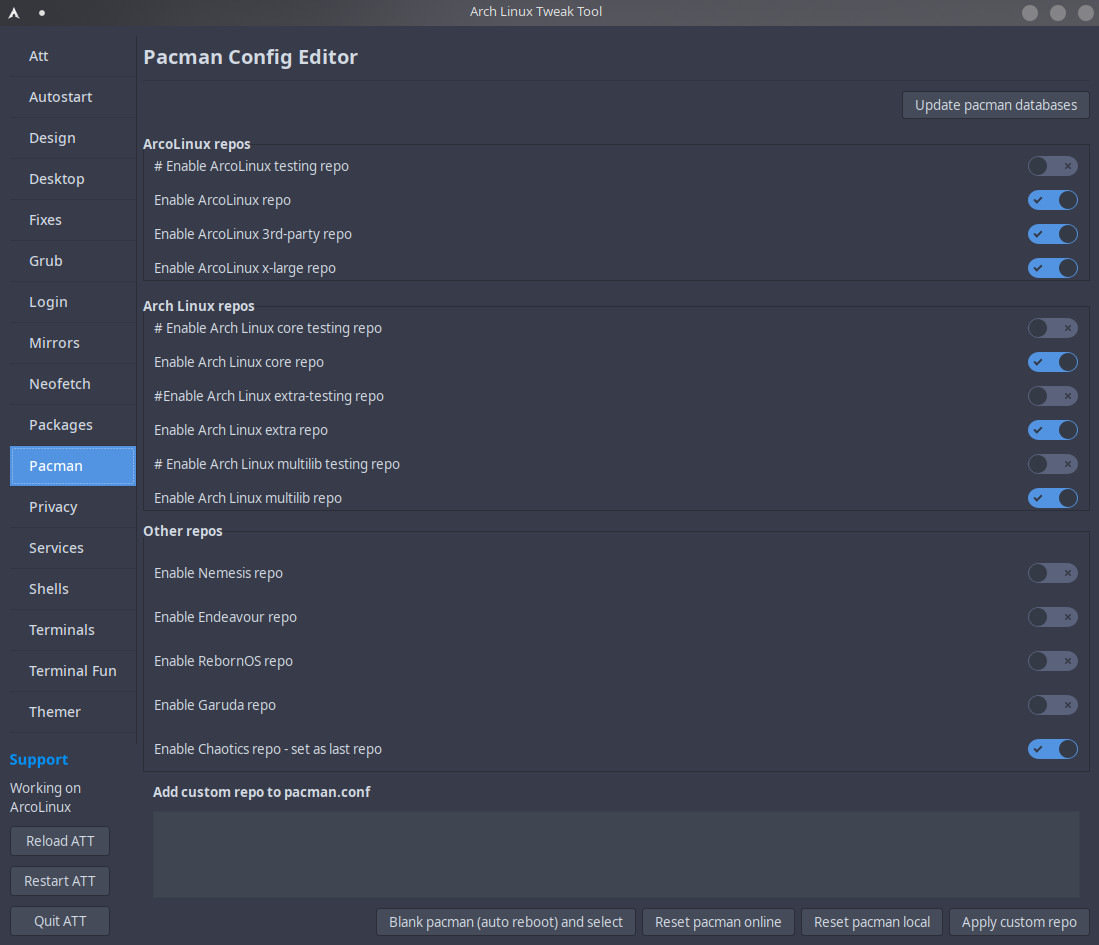
Also make sure the checkboxes are enabled next to “ArcoLinux 3rd-party repo” and “ArcoLinux x-large repo” at the top of the window.

Then click “Update pacman databases” at the top of the window and wait a moment until a notification at top of the window says something about databases being updated.

Close ArchLinux-Tweak-Tool and in Terminal type:

update

When all the latest updates have been installed we need an additional tool called “Paru”, (this is installed by default on ArcoLinux), but if you are using another Arch-based distro type the following in Terminal:

sudo pacman -S paru-bin

We can now proceed to setup the build environment.

Setup the ArcoLinux build environment:

There’s a lot of files required, but some are already installed by default when installing ArcoLinux.

The full list of libraries are:

acl alsa-lib alsa-oss alsa-plugins atk attr base-devel bc bison bzip2 cairo celt cmake dbus-core e2fsprogs expat flac flex fontconfig freetype2 gcc gcc-libs gdk-pixbuf2 gettext giflib glew glib glib2 glibc gmp gnutls gtk gtk2 inetutils json-c keyutils krb5 lcms libao libasyncns libcanberra libcanberra-pulse libcap libcups libffi libgbm libgcrypt libgpg-error libice libidn libjpeg-turbo libldap libltdl libmikmod libmng libogg libpciaccess libphobos libpng libpulse libsamplerate libsm libsndfile libssh2 libstdc++5 libtiff libvorbis libx11 libxau libxcb libxcomposite libxcursor libxdamage libxdmcp libxext libxfixes libxft libxi libxinerama libxml2 libxmu libxrandr libxrender libxss libxt libxtst libxv libxvmc libxxf86vm mesa mesa-demos mpg123 multilib-devel ncurses nettle openal openssl osmesa p11-kit pango pcre pixman qt4 readline sdl sdl_image sdl_ttf speex sqlite3 tdb util-linux v4l-utils xcb-util zlib

But these are the commands i used to install the extra files:

mkdir ~/src
cd src

wget https://github.com/Kitware/CMake/releases/download/v3.18.0/cmake-3.18.0.tar.gz

tar xvf cmake-3.18.0.tar.gz

cd cmake-3.18.0

./bootstrap --parallel=$(nproc) --prefix=/usr && make -j $(nproc) && sudo make install
sudo pacman -S python-pip

python --version

sudo rm /usr/lib/python3.11/EXTERNALLY-MANAGED

sudo pip3 install --upgrade pip
sudo pacman -S alsa-oss apr-util celt glew libcanberra libmikmod libphobos libstdc++5 libxcrypt-compat libxvmc mesa-demos qt4 sdl_image sdl_ttf

When typing the following “paru” commands in Terminal it will search for the relevant files. The most relevant file is usually at the bottom of the search results and you type the number next to the file you want to install and hit enter:
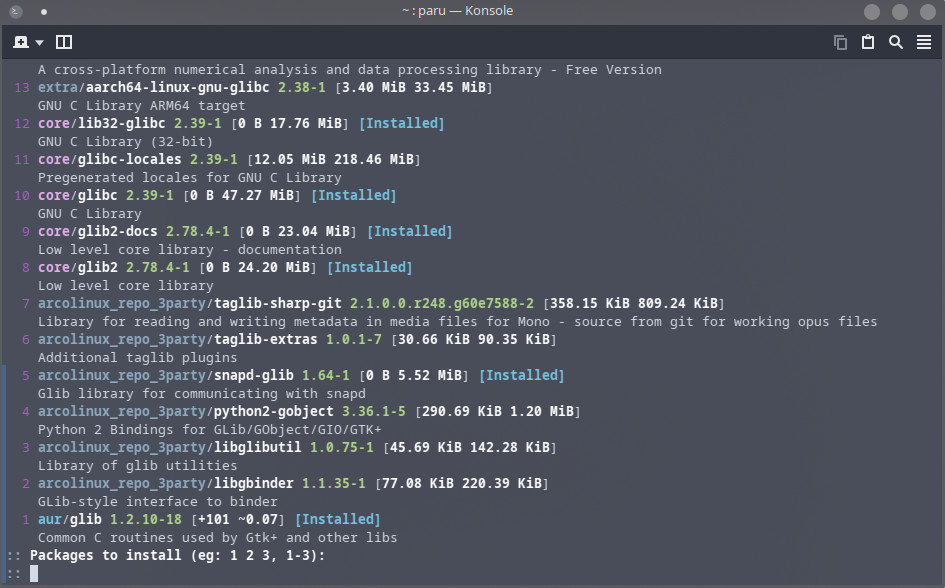
paru glib
paru glew-osmesa-git
paru gtk
paru sdl

If you have an Nvidia graphics card, you’re going to need this:

sudo pacman -S nvidia-utils nvidia-libgl

Get the Firestorm viewer source code:

cd ~/src
git clone https://github.com/FirestormViewer/phoenix-firestorm.git

This will download a copy of Firestorm viewer source code.

Install Autobuild the get the build variables:

cd ~/src

sudo pip3 install git+https://github.com/secondlife/autobuild.git#egg=autobuild

git clone https://github.com/FirestormViewer/fs-build-variables.git

Get FmodStudio (Optional):

By default the viewer uses OpenAL for audio but if you want to use FmodStudio instead, (apparently its improves audio):

cd ~/src
git clone https://github.com/FirestormViewer/3p-fmodstudio.git
cd ~/src/3p-fmodstudio

The following instruction for getting the required files to build FmodStudio was mostly pasted from the Official Firestorm linux guide:

Using your File Manager, open the file called "build-cmd.sh" using a text editor (it's located in "~/src/3p-fmodstudio") and look at the fifth line down, it begins with FMOD_VERSION. This is the version of the API you need to download.

The FMOD Studio API can be downloaded HERE (requires creating a free account to access the download section). Log in as needed, then go to https://www.fmod.com/download. Click FMOD Engine to expand the section.

Click the button representing the version you're after, then click the Download link for the Linux file.

Copy that file to the ~/src/3p-fmodstudio directory.

Now this step is a bit janky but I had to do it in this precise order or it wouldn’t build the FmodStudio file:

cd ~/src/3p-fmodstudio

export AUTOBUILD_VARIABLES_FILE=$HOME/src/fs-build-variables/variables

autobuild build -A 64 --all

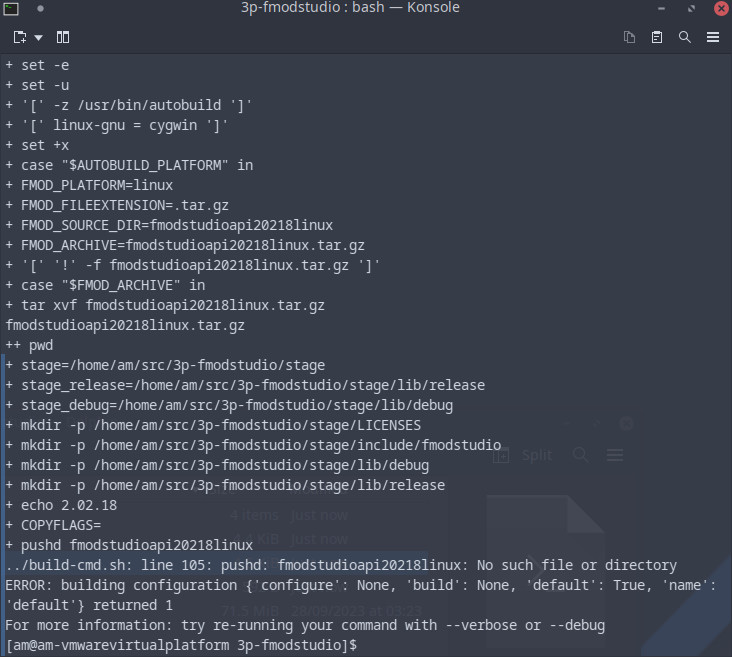
There will be an Error but it’s OK, you now need to edit “build-cmd.sh”, and on the 3rd line down you need to change it from:

FMOD_DOWNLOAD_BASE="http://erebus/dev/pkg/"

And replace it with:

FMOD_DOWNLOAD_BASE="http://localhost/dev/pkg/"

and save the file. Then run the following:

autobuild build -A 64 --all
autobuild package -A 64
I had tried editing the 3rd line before doing the FmodStudio build process but it wouldn't work (hence the janky step above).

(Credit to https://beccapet.com/ for pointing out the need to edit this file as it wasn’t mentioned on the Official Firestorm Linux compile instructions).

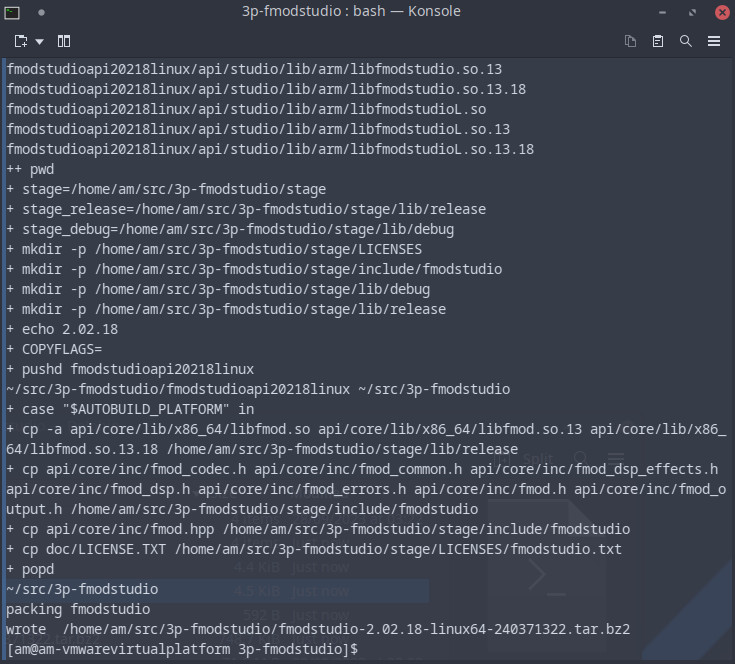
Near the end of the output you will see the package name.

Also type the following to see the md5 hash:

md5sum fmodstudio-2.02.18-linux64-240371322.tar.bz2

And you should see something like:

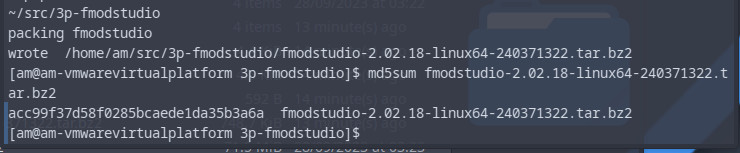
In my case it showed:

Now do:

cd ~/src/phoenix-firestorm

Copy the FMOD Studio path and md5 value from the package process into this command:

autobuild installables edit fmodstudio platform=linux64 hash=<md5 value> url=file:///<fmodstudio path>

For example (you would need to type your own info in this section):

autobuild installables edit fmodstudio platform=linux64 hash=acc99f37d58f0285bcaede1da35b3a6a url=file:////home/am/src/3p-fmodstudio/fmodstudio-2.02.18-linux64-240371322.tar.bz2

Configure and build the Viewer:

export AUTOBUILD_VARIABLES_FILE=$HOME/src/fs-build-variables/variables
cd ~/src/phoenix-firestorm

autobuild configure -A 64 -v -c ReleaseFS_open -- --chan="YOURCHANNEL" --package --fmodstudio --no-opensim --avx2 -DLL_TESTS:BOOL=FALSE

At this point you may see some errors downloading 3 or 4 of the libraries due to the wrong “md5 hash” listed in the autobuild.xml.

I think it may be an oversight on the Firestorm devs part but it’s a simple workaround.

Simply download the file it fails the md5 check on from the url shown in terminal and copy it to:

“/var/tmp/am/install.cache/”

(“am” will need to be replaced with the username of yourself on your linux distro)

Repeat the above process for each failed md5 check.

autobuild build -A 64 -v -c ReleaseFS_open -- --chan="YOURCHANNEL" --package --fmodstudio --no-opensim --avx2 -DLL_TESTS:BOOL=FALSE

I use the – -avx2 flag as it’s an optimisation for modern CPUs. If you have an older CPU you may need to remove that build parameter from the configure command.

Also if you plan to use Firestorm Viewer on other “OpenSim” grids then remove the
– -no-opensim flag from the configure/build commands.

If you get an error mentioning “-Werror”, (compiler warning treated as errors), it’s not really a problem and can be bypassed by editing the file: “~/src/phoenix-firestorm/indra/cmake/00-Common.cmake”.

Look for the line: set(GCC_WARNINGS “${GCC_WARNINGS} -Werror”)

and put an # in front of it so it looks like the following and save the file, then it should build without any problems:

After building Firestorm Viewer:

After Firestorm Viewer has finished compiling, it will package it into a file called something like “Phoenix-Firestorm-YOURCHANNEL-6-6-17-70368.tar.xz” which can be found in:

cd ~/src/phoenix-firestorm/build-linux-x86_64/newview/

To extract the file do:

tar -xf Phoenix-Firestorm-YOURCHANNEL-6-6-17-70368.tar.xz

Then:

cd Phoenix-Firestorm-YOURCHANNEL-6-6-17-70368

Firestorm can be run directly from this folder by typing:

./firestorm

Or you can install it on your system by typing:

./install.sh

There are some README files in the Firestorm directory you can read if you want to know more about using Firestorm on Linux or to read about troubleshooting .

It was quite satisfying getting this Viewer build-process to work from a nerdy perspective as I doubt many people have done it (and documented the process.)

Hope this guide of mine helps fellow ArcoLinux (and other Arch-based distro) users to build and use Firestorm without having to rely on that other spy-ridden operating system also known as MS Windows. 😉

Posted in Uncategorized | Tagged , , , , , , , , | Leave a comment

Setting up Build Environment in Ubuntu 11.10 for building Firestorm Viewer

After recently installing Ubuntu 11.10 and figuring out how to get latest Nvidia drivers setup and successfully building Firestorm on it, i thought some others may find this short guide useful, especially as Linux doesn’t seem to be affected by any of the Nvidia problems that have been a pain on Windows recently since the Mesh code was added. (Nvidia 285.05.09 runs perfectly on a GTX460M in Ubuntu 11.10)…;):

First, Download the latest Ubuntu 11.10 32-bit ISO from here: http://www.ubuntu.com/start-download?distro=desktop&bits=32&release=latest

Once Ubuntu-11.10 LiveCD or USB is loaded:

Click “Install Ubuntu 11.10”.
Follow steps and when prompted Tick the 2 boxes to install 3rd party drivers.

Once installed and rebooted:
Open Terminal and type:

sudo add-apt-repository ppa:ubuntu-x-swat/x-updates
sudo apt-get update
sudo apt-get install nvidia-common nvidia-settings

Click Gear icon in top right of screen and click “Updates Available…”, and install updates.

Once completed press CTRL + ALT + F1 to open true Terminal and type:

sudo service lightdm stop

then:

sudo nvidia-xconfig

Once it say a message abount writing a new X-config file, type:

sudo service lightdm start

Then Reboot computer.

———-

To fix boot splash screen resolution:

sudo apt-get install v86d hwinfo
sudo hwinfo --framebuffer

(take note of resolutions as highest one might not work…so may need to try a lower one).

sudo gedit /etc/default/grub

Search for: GRUB_GFXMODE=
And replace line with: GRUB_GFXMODE=1280×800 (<- your-resolution-here)
Below this you need to type: GRUB_GFXPAYLOAD_LINUX=1280×800 (<- your-resolution-here)
Save file and close it.

echo FRAMEBUFFER=y | sudo tee /etc/initramfs-tools/conf.d/splash
sudo update-grub2
sudo update-initramfs -u

———

Open Ubuntu Software centre.
Install the following:

mercurial

g++
distcc
ccache
tortoisehg-nautilus

———-

Make a folder called “Src” in your Home Folder.
Open terminal and navigate to it, then type:

hg clone http://hg.secondlife.com/autobuild
cd autobuild
sudo python setup.py install

Sometimes autobuild doesn’t install the first time, so check to be sure you have it in /usr/local/bin with this command:

which autobuild

If it isn’t there, run “sudo python setup.py install” again and do the which command again.

Reboot computer.

———

Open Terminal and go to /Home/Src folder and type:

sudo apt-get install libc6-dev libstdc++6 libx11-dev libxrender-dev nvidia-current-dev
sudo apt-get install libglu1-mesa-dev zlib1g-dev libssl-dev libogg-dev libpng12-dev libdbus-glib-1-dev libgtk2.0-dev
sudo apt-get install subversion cmake gcc-4.4 g++-4.4 build-essential bison flex libc6-dev libstdc++6 libx11-dev libxrender-dev libxml2-dev libgl1-mesa-dev libglu1-mesa-dev zlib1g-dev libssl-dev libogg-dev libpng12-dev libdbus-glib-1-dev libgtk2.0-dev python-pip

sudo update-alternatives --install /usr/bin/gcc gcc /usr/bin/gcc-4.4 60 --slave /usr/bin/g++ g++ /usr/bin/g++-4.4 --slave /usr/bin/gcov gcov /usr/bin/gcov-4.4

hg clone http://hg.phoenixviewer.com/phoenix-firestorm-lgpl/
cd phoenix-firestorm-lgpl

Pull latest updates:

If you’re familiar with using TortoiseHG GUI then type the following to open it and pull latest updates or apply patches you have:

sudo thg

(It seems to only see the Linux folders and not the other drives i have in sudo mode, but simply copy any patches you want to apply into the same folder using Nautilus file browser and it will find them.)

OR if you dont use TortoiseHG GUI then type:

hg pull
hg update

Go back to Terminal at /Home/Src/phoenix-firestorm-lgpl/ and type:

sudo autobuild configure -c ReleaseFS_open

Once completed type:

sudo autobuild build -c ReleaseFS_open

If all goes well, and you used the folder structure i used then you can find your built package (tar.bz2 file) in “/Home/Src/phoenix-firestorm-lgpl/build-linux-i686/newview/”.

Posted in Uncategorized | 10 Comments

Steps to Compile Phoenix Viewer

Note:

I see some webpages referring to my previous blogpost and i’ve tidied up my compiling process since then, and also managed to compile 2.xx based viewers too, which required a couple more things done in the compiler setting up.

(I used my Acer Netbook to go-over the process below to make sure the steps worked as written and also to see if a Netbook could handle compiling a viewer.)

Programs Required:

In this tutorial I used source code from a “HG Repository”, so you will need to download “Mercurial” to get the source-code I used in this guide:

Download Mercurial

(Choose either “Mercurial 1.7.3 Inno Setup installer – x64 Windows ” or “Mercurial 1.7.3 Inno Setup installer – x86 Windows” depending on version of Windows you have (64-bit or 32-bit) ).

MS Visual C++ 2005 Express with SP2:
Click here to download Visual C++ 2005 Express with SP2

(Ideally it would be preferred to use “MS Visual Studio 2005 Professional” instead of “MS Visual C++ 2005 Express”, as the latter spits out some compile errors after compiling that have to be edited and fixed as explained in this tutorial.

I’m sure some of you reading this may either have “MS Visual Studio 2005 Professional” or decide to “acquire” it via some shifty download site (although i don’t condone it), in which case you would need to install the following updates for it:

MS Visual Studio 2005 Team Suite Service Pack 1

Visual Studio 2005 Service Pack 1 Update for Windows Vista (Also applies to Windows-7)

(Remember you only need to install the 2 updates above if you have “MS Visual Studio 2005 Professional”)

The Windows Platform SDK:

Windows SDK for Windows Server 2008 and .NET Framework 3.5 (The only required portion you need to install is Developer Tools > Windows Headers and Libraries.)

DirectX 9.0 SDK:
DirectX 9.0 SDK (June 2010) (You only need to Install “Headers and Libs” from this Installer.) (It sucks that you have to download a 590mb file just to install a few files from it but they don’t seem to have a web-installer for DirectX 9.0 SDK…:/ )

CMake:
download CMake

Cygwin:
download Cygwin

(When you run the cygwin setup utility make sure you have selected to install patchutils, flex, bison, and zlib-devel (all located under “devel”) which are not part of the default install. (If you missed one of these, the easiest thing to do is to re-run the entire installation.) )

Python:
Python.org Standard Python

UniCode NSIS:  Download HERE
(This is the package installer used to build Setup.exe, which some Viewer Compiles like the new Phoenix-Firestorm 2.xx  viewer uses.)

Fmod:
(Download & extract FMOD3.75 API for Windows)

Quicktime SDK for Windows:
(NOTE: This download requires free Registration at the Apple Quicktime website, which will take a few minutes.  After registering on the website click link below again to get to the download page).
QuickTime 7.3 SDK for Windows (ZIP)

Preparation:

Proprietary libraries:

There are some libraries which LL doesnt supply, and so you will need to follow the instructions below and copy them to your source tree.

Its a good idea to make a new folder structure somewhere to put the “Proprietary libraries” so you can copy and merge them with your Source-code for each Viewer compile you do (as it will save you time).

Make a new folder on your hard-drive in the root called something like “compile”, then open a dos command prompt box and go to that folder then copy the text below and paste it into the dos box:

md olibs
md olibs\linden\
md olibs\linden\libraries
md olibs\linden\libraries\include
md olibs\linden\libraries\i686-win32
md olibs\linden\libraries\i686-win32\lib\release
md olibs\linden\libraries\i686-win32\lib\debug
md olibs\linden\libraries\i686-win32\include
md olibs\linden\libraries\i686-win32\include\GL
md olibs\linden\libraries\i686-win32\include\quicktime
md olibs\linden\indra
md olibs\linden\indra\newview

Now you will have a folder structure to put the Proprietary files.

In your file manager go to the folder where you extracted “Fmod”, and:

  • Copy “fmodapi375win\api\inc\fmod.h” to “linden\libraries\include”
  • Copy “fmodapi375win\api\inc\fmod_errors.h” to “linden\libraries\include”
  • Copy “fmodapi375win\api\inc\fmoddyn.h” to “linden\libraries\include”
  • Copy “fmodapi375win\api\lib\fmodvc.lib” to “linden\libraries\i686-win32\lib\release” and to “linden\libraries\i686-win32\lib\debug”
  • Copy “fmodapi375win\api\fmod.dll” to “linden\indra\newview”

In your file manager go to the folder where you installed “Quicktime SDK” (e.g: C:\Program Files\QuickTime SDK\), and:

  • Copy “QuicktimeSDK\Libraries\QTMLClient.lib” to “linden\libraries\i686-win32\lib\release” and to “linden\libraries\i686-win32\lib\debug”.
  • Copy the contents of “QuicktimeSDK\CIncludes” into “linden\libraries\i686-win32\include\quicktime”.

(The destination “linden” folder is located in the “olibs” folder which you created in the previous step.)

Download some Viewer Source-code:

In this guide I am compiling the “Phoenix Viewer” Source code, so to obtain the source code by doing the following (assuming you have already installed “Mercurial”):

Open a dos command prompt box and navigate your way to the “compile” folder you made in an earlier step on your hard drive then type:

hg clone http://hg.phoenixviewer.com/phoenix-sg/

If all goes well the clone command should result in something like this:

requesting all changes
adding changesets
adding manifests
adding file changes
added 2 changesets with 2 changes to 2 files
updating to branch default
2 files updated, 0 files merged, 0 files removed, 0 files unresolved

The source code might take 10-15 minutes to download depending on your connection, and you should now find a folder in the “compile” folder called “phoenix-sg”.

Note:

After the initial download of the Source code you can get the latest updates to it without having to download it from scratch by going to the source code folder (in this case “phoenix-sg”), and typing “hg pull”, which will result in something like:

pulling from http://hg.phoenixviewer.com/
searching for changes
adding changesets
adding manifests
adding file changes
added 4 changesets with 4 changes to 4 fi
(run 'hg update' to get a working copy)

Then type “hg update” and it will place the updated files in the main source code making it the latest version of the source:

4 files updated, 0 files merged, 0 files removed, 0 files unresolved

Before we continue you will need to add a couple of directories to your system PATH to make “cmake” and “python” commands work from any folder:

Open “Control Panel”, click “System”, click “Advanced/Advanced System Settings”, click “Environment Variables”, then under “System Variables” scroll down to “Path” and double-click it.

Look through the “Variable Value” and if you cant see “cmake” or “python” in there then on the end of the text add:

“;C:\Program Files\CMake 2.6\bin\;C:\Python26″.
(Your “cmake” might be in “Program Files (x86)” if you have 64-bit version of Windows).

Next you need to setup some Directory Paths in Visual C++ 2005 Express:

(Please Note: your folder paths may vary if you didnt download the exact versions of the files I gave at top of this tutorial, also they may vary if you are using 64-bit windows i.e…”Program Files (x86)” instead of “Program Files”)

* Start “Visual C++ 2005 Express”.
* Go to Tools > Options > Projects and Solutions > VC++ Directories.

* Select “Executable files” from the upper-right dropdown list and add the following paths just above “$(PATH)” in the matching list:

  • “$(SystemRoot)”
  • “$(SystemRoot)\System32”
  • “$(SystemRoot)\System32\wbem”

* Select “Executable files” from the upper-right dropdown list again and add the following paths to the bottom of the matching list:

  • “C:\Program Files\Microsoft SDKs\Windows\v6.1\Bin\”
  • “C:\Program Files\CMake 2.6\bin”
  • “C:\Python26″
  • “C:\Program Files\NSIS”
  • “C:\cygwin\bin”

Now your Executable Files section should look like this, (add any lines to yours if they are in the list below but missing from yours…and the “order” of the lines below seems to be important so don’t muddle them up):

$(VCInstallDir)bin
$(VCInstallDir)PlatformSDK\bin
$(VSInstallDir)Common7\Tools\bin
$(VSInstallDir)Common7\tools
$(VSInstallDir)Common7\ide
$(ProgramFiles)\HTML Help Workshop
$(FrameworkSDKDir)bin
$(FrameworkDir)$(FrameworkVersion)
$(VSInstallDir)
$(SystemRoot)
$(SystemRoot)\System32
$(SystemRoot)\System32\wbem
C:\Program Files\CMake 2.6\bin
C:\Python26
c:\Program Files\NSIS
$(SystemRoot)\SysWow64   (needed in 64-bit windows versions, exclude for 32-bit)
$(FxCopDir)
$(PATH)
c:\cygwin\bin

* Select “Include Files” from the upper-right dropdown list and add the following paths to the bottom of the list:

  • “C:\Program Files\Microsoft SDKs\Windows\v6.1\Include”
  • “C:\Program Files\Microsoft SDKs\Windows\v6.1\Include\gl”
  • “C:\Program Files\Microsoft DirectX SDK (June 2010)\Include”

* Select “Library Files” from the upper-right dropdown list and add the following paths to the bottom of the list:

  • “c:\Program Files\Microsoft SDKs\Windows\v6.1\Lib”
  • “c:\Program Files\Microsoft DirectX SDK (June 2010)\Lib\x86″

Click OK after adding these folder paths to make sure they are saved.

Preparing Source-code for Compile:

Next step is to go to and open “compile” folder you made earlier on your hard-drive and make a new folder called something like “viewer”. Then go to “phoenix-sg” folder which we downloaded earlier from viewer-source website.

Copy and paste the following folders and any files from the “phoenix-sg” folder into your “viewer” folder:

  • doc
  • etc
  • indra
  • scripts
  • install.xml

(Dont copy “.hg” folder as you dont need it for compiling).

Next go to “olibs” folder we added the Proprietary files to earlier, open the “linden” folder inside it, and copy and paste “indra” and “libraries” folders into “viewer” (phoenix-sg) folder (and choose to replace/overwrite on any folder warning boxes that appear).

Now all the prep-work is out of the way:

Navigate your way to the “Visual Studio 2005 Command Prompt”:

Start Menu –> Visual C++ 2005 Express Edition –> Visual Studio Tools –> Visual Studio 2005 Command Prompt

(Using regular command prompt won’t work for the next step as it wouldn’t find the needed programs.)

Navigate to the “compile” folder then type:

cd viewer
cd indra
python develop.py -G VC80

“The above commands will configure a “non-standalone” version of the source code tree. This means that the required third party library packages (as built by LL) will be downloaded during the CMake process.”

When using the Express Edition of Visual Studio you will see an error message something similar to this after running the above command:

Looking for existing VisualStudio instance...
 Didn't find open solution, starting new background VisualStudio instance...
 Reading .sln file version...
 Using version: VC80...
Value cannot be null.
Parameter name: type
Quitting do to error opening: C:\src\phoenix-sg\indra\build-VC80\SecondLife.sln

…this is normal as its trying to use a file that isnt included in the Express Edition, so disregard the error as its not important

Once the above command has completed and returned to command prompt, navigate to “compile\viewer\indra\build-VC80″ folder in your file manager and open “SecondLife.sln”. (This will open Visual C++ 2005 Express and load the “Solution file”.)

Click the dropdown menu to the right of the little green triangle on the top menu bar and change the “Solution Configurations” to “Release“.

Next right-click on secondlife.bin in the Solution Explorer List on left side of window, and click “Set as StartUp Project”, then right click it again and click “Properties”, then open “Configuration Properties”, then click “Debugging”, and change the “Working Directory” to “[your drive letter]:/compile/viewer/indra/newview”.

Right-click on prepare in the Solution Explorer List on left side of window, and click “Project Only”  —> “Build Only prepare”.

This will download a list of “pre-built binaries” and extract them to a temp folder which are needed for the compile process. It might take 10-15 minutes for it to download all the pre-built binaries, but it will show in the “Output box” at the bottom of the window when it has completed this stage. (Once these files have been downloaded once, they are kept in the temp folder, so you don’t have to download them each time you want to compile a viewer)

Finally click “Build” menu then “Build Solution”, then wait for a while for the compiling to be done.

If you’re using “MS Visual Studio 2005 Professional” with the service pack updates installed then you won’t get the compile errors below, but if using “Visual C++ 2005 Express” then you will probably see some errors like this:

..\..\newview\llmanip.cpp(109) : error C2664: 'boost::signals::connection boost::signal1<R,T1,Combiner,Group,GroupCompare,SlotFunction>::connect(const boost::slot<SlotFunction> &,boost::signals::connect_position)': Convert parameter 1 from 'void (__cdecl *) (const LLSD &)' const in 'boost:: slot <SlotFunction> &' not possible
with
[
R=void,
T1=const LLSD &,
Combiner=boost::last_value<void>,
Group=int,
GroupCompare=std::less<S32>,
SlotFunction=boost::function<void (const LLSD &)>
]
and
[
SlotFunction=boost::function<void (const LLSD &)>
]
Cause: conversion from 'overloaded-function' in 'const boost:: slot <SlotFunction>' not possible
with
[
SlotFunction=boost::function<void (const LLSD &)>
]
Source type could be accepted by any constructor or the constructor overload resolution is ambiguous

These errors will cause the compile attempt to fail but are relatively easy to fix…^^.

To fix the above errors scroll down the compile “output window” and where (in the case of the above example) it shows “..\..\newview\llmanip.cpp(109) : error C2664: 'boost::signals::connection “, double-click on that line and it will open the file and will show the line of code with the problem.

You will see this code:

gSavedSettings.getControl(“PhoenixBuildPrefs_ActualRoot”)->getSignal()->connect(&updateActualRoot);

What will fix this line is adding the following into the line of code:

“(boost::function<void (const LLSD &)>) “

So the line will now look like this

gSavedSettings.getControl(“PhoenixBuildPrefs_ActualRoot”)->getSignal()->connect((boost::function<void (const LLSD &)>) &updateActualRoot);

(or to highlight it to show its position in the code better):

gSavedSettings.getControl(“PhoenixBuildPrefs_ActualRoot”)->getSignal()->connect((boost::function<void (const LLSD &)>) &updateActualRoot);

Basically on each line that has an “error C2664” put the code between “getSignal()->connect(” and ”&” on that line.

Once you have edited a file with the errors in it, click in the file window anywhere, then click “File”….”Save llmanip.cpp”.

Do the same with the other Error files.

Once you have fixed the “error C2664” lines, which, you might have about 17 of them to fix, click “Build” menu and then “Build Solution” again, and this time it should Compile sucessfully.

If all goes well you should see something\q like this at end of compile output window:

1>Embedding manifest...
1>Copying llcommon.dll to the runtime folder.
1>Build log was saved at "file://c:\src\phoenix-sg\indra\build-VC80\newview\secondlife-bin.dir\Release\BuildLog.htm"
1>secondlife-bin - 0 error(s), 56 warning(s)
2>------ Skipped Build: Project: ALL_BUILD, Configuration: Release Win32 ------
2>Project not selected to build for this solution configuration
3>------ Skipped Build: Project: viewer, Configuration: Release Win32 ------
3>Project not selected to build for this solution configuration

Hopefully it Compiled for you, then the next steps are to locate all the Viewer files and put them in a new folder:

Make a new folder somewhere, then copy the contents of your “/compile/viewer/indra/newview/build-vc80/release/*” into the new folder, but you dont need to copy “secondlife-bin.*” files apart from the .exe as the others arent needed to run the viewer.

Next copy the following folders from “/compile/viewer/indra/newview/” to your new folder:

  • app_settings
  • character
  • fonts
  • skins

Copy the following files from “/compile/viewer/indra/newview/” to your new folder:

  • “fmod.dll”
  • “dbghelp.dll”
  • gpu_table.txt
  • all .txt files that include ‘feature’

Copy the following folder from “/compile/viewer/libraries/i686-win32/lib/release” folder to the “llplugin” folder which is in your new folder:

  • codecs

Copy the following Licence TXT file from the “/compile/viewer/indra/newview/” folder to the new folder (just for the sake of legitimacy i guess):

  • licenses-win32.txt

(In Phoenix Official installs it has a file called “libsndfile-1.dll” which i think is needed for “Voice” and for some reason it didn’t add it when compiling from source for me, so if you need Voice then install Official Phoenix viewer and copy file from that install folder to the newly Compiled Viewer folder.)

There you have it…^^.

Hope this Page is of some use to those who want to compile an SL viewer from source-code. (and hopefully i havent missed out anything.)

If you are feeling adventurous and plan to modify the viewer source-code which you download, then you should give the viewer a “Unique Viewer Channel” in the code, which LL checks as it logs on to SL, for more info about how to do that look at the bottom of this web-page: http://wiki.secondlife.com/wiki/Get_source_and_compile

These are some of the links I used to make this guide:

http://wiki.secondlife.com/wiki/Microsoft_Windows_Builds

http://wiki.secondlife.com/wiki/Viewer_2_Microsoft_Windows_Builds

http://imprudenceviewer.org/wiki/How_to_compile

http://wiki.secondlife.com/wiki/Microsoft_Visual_Studio

http://wiki.secondlife.com/wiki/Compiling_the_Viewer_%28MSVS2008%29

http://imprudenceviewer.org/forums/viewtopic.php?f=7&p=6381

Posted in Uncategorized | 7 Comments

Steps to Compile an SL Viewer:

(1.xx based viewers)

Programs Required:

In this tutorial I used source code from a “HG Repository”, so you will need to download “Mercurial” to get the source-code I used in this guide:

Download Mercurial

Visual C++ 2005 Express with SP2:
Click here to download Visual C++ 2005 Express with SP2

The Windows Platform SDK:
Windows SDK for Windows Server 2008 and .NET Framework 3.5 (The only required portion you need to install is Developer Tools > Windows Headers and Libraries.)

DirectX 9.0 SDK:
DirectX 9.0 SDK (August 2008) (You only need to Install “Headers and Libs” from this Installer.)

CMake:
download CMake

Cygwin:
download Cygwin

(When you run the cygwin setup utility make sure you have selected to install patchutils, flex, bison, and zlib-devel (all located under “devel”) which are not part of the default install. (If you missed one of these, the easiest thing to do is to re-run the entire installation.) )

Python:
Python.org Standard Python

Fmod:
(Download & extract FMOD3.75 API for Windows)

Quicktime SDK for Windows:
(NOTE: This download requires free Registration at the Apple Quicktime website, which will take a few minutes).
QuickTime 7.3 SDK for Windows (ZIP)

Preparation:

Proprietary libraries:

There are some libraries which LL doesnt supply, and so you will need to follow the instructions below and copy them to your source tree.

Its a good idea to make a new folder structure somewhere to put the “Proprietary libraries” so you can copy and merge them with your Source-code for each Viewer compile you do (as it will save you time).

Make a new folder on your hard-drive in the root called something like “compile”, then open a dos command prompt box and go to that folder then copy the text below and paste it into the dos box:

md olibs
md olibs\linden\
md olibs\linden\libraries
md olibs\linden\libraries\include
md olibs\linden\libraries\i686-win32
md olibs\linden\libraries\i686-win32\lib\release
md olibs\linden\libraries\i686-win32\lib\debug
md olibs\linden\libraries\i686-win32\include
md olibs\linden\libraries\i686-win32\include\GL
md olibs\linden\libraries\i686-win32\include\quicktime
md olibs\linden\indra
md olibs\linden\indra\newview

Now you will have a folder structure to put the Proprietary files.

In your file manager go to the folder where you extracted “Fmod”, and:

  • Copy “fmodapi375win\api\inc\fmod.h” to “linden\libraries\include”
  • Copy “fmodapi375win\api\inc\fmod_errors.h” to “linden\libraries\include”
  • Copy “fmodapi375win\api\inc\fmoddyn.h” to “linden\libraries\include”
  • Copy “fmodapi375win\api\lib\fmodvc.lib” to “linden\libraries\i686-win32\lib\release” and to “linden\libraries\i686-win32\lib\debug”
  • Copy “fmodapi375win\api\fmod.dll” to “linden\indra\newview”

In your file manager go to the folder where you installed “Quicktime SDK” (e.g: C:\Program Files\QuickTime SDK\), and:

  • Copy “QuicktimeSDK\Libraries\QTMLClient.lib” to “linden\libraries\i686-win32\lib\release” and to “linden\libraries\i686-win32\lib\debug”.
  • Copy the contents of “QuicktimeSDK\CIncludes” into “linden\libraries\i686-win32\include\quicktime”.

(The destination “linden” folder is located in the “olibs” folder which you created in the previous step.)

Download some Viewer Source-code:

In this guide I am compiling the “Phoenix Viewer” Source code, so to obtain the source code by doing the following (assuming you have already installed “Mercurial”):

Open a dos command prompt box and navigate your way to the “compile” folder you made in an earlier step on your hard drive then type:

hg clone http://hg.phoenixviewer.com/phoenix-sg/

If all goes well the clone command should result in something like this:

requesting all changes
adding changesets
adding manifests
adding file changes
added 2 changesets with 2 changes to 2 files
updating to branch default
2 files updated, 0 files merged, 0 files removed, 0 files unresolved

The source code might take 10-15 minutes to download depending on your connection, and you should now find a folder in the “compile” folder called “phoenix-sg”.

Before we continue you will need to add a couple of directories to your system PATH to make “cmake” and “python” commands work from any folder:

Open “Control Panel”, click “System”, click “Advanced/Advanced System Settings”, click “Environment Variables”, then under “System Variables” scroll down to “Path” and double-click it.

Look through the “Variable Value” and if you cant see “cmake” or “python” in there then on the end of the text add:

“;C:\Program Files\CMake 2.6\bin\;C:\Python26”.
(Your “cmake” might be in “Program Files (x86)” if you have 64-bit version of Windows).

Next you need to setup some Directory Paths in Visual C++ 2005 Express:

(Please Note: your folder paths may vary if you didnt download the exact versions of the files I gave at top of this tutorial, also they may vary if you are using 64-bit windows i.e…”Program Files (x86)” instead of “Program Files”)

* Start “Visual C++ 2005 Express”.
* Go to Tools > Options > Projects and Solutions > VC++ Directories.
* Select “Executable files” from the upper-right dropdown list and add the following paths to the bottom of the matching list:

  • “C:\Program Files\CMake 2.6\bin”
  • “C:\Python26”
  • “c:\cygwin\bin”

* Select “Include Files” from the upper-right dropdown list and add the following paths to the bottom of the list:

  • “c:\Program Files\Microsoft SDKs\Windows\v6.1\Include”
  • “c:\Program Files\Microsoft SDKs\Windows\v6.1\Include\gl”
  • “c:\Program Files (x86)\Microsoft DirectX SDK (August 2008)\Include”

* Select “Library Files” from the upper-right dropdown list and add the following paths to the bottom of the list:

  • “c:\Program Files\Microsoft SDKs\Windows\v6.1\Lib”
  • “c:\Program Files (x86)\Microsoft DirectX SDK (August 2008)\Lib\x86”

Click OK after adding these folder paths to make sure they are saved.

Preparing Source-code for Compile:

Next step is to go to and open “compile” folder you made earlier on your hard-drive and make a new folder called something like “viewer”. Then go to “phoenix-sg” folder which we downloaded earlier from viewer-source website.

Copy and paste the following folders and any files from the “phoenix-sg” folder into your “viewer” folder:

  • doc
  • etc
  • indra
  • scripts
  • install.xml

(Dont copy “.hg” folder as you dont need it for compiling).

Next go to “olibs” folder we added the Proprietary files to earlier, open the “linden” folder inside it, and copy and paste “indra” and “libraries” folders into “viewer” folder (and choose to replace/overwrite on any folder warning boxes that appear).

Now all the prep-work is out of the way:

Open a Dos command prompt box and navigate to the “compile” folder then type:

cd viewer
cd indra
python develop.py -G VC80

“The above commands will configure a “non-standalone” version of the source code tree. This means that the required third party library packages (as built by LL) will be downloaded during the CMake process.”

Once the above command has completed and returned to command prompt, navigate to “compile\viewer\indra\build-VC80” folder in your file manager and open “SecondLife.sln”. (This will open Visual C++ 2005 Express and load the “Solution file”.)

Click the dropdown menu to the right of the little green triangle on the top menu bar and change the “Solution Configurations” to “Release“.

Next right-click on secondlife.bin in the Solution Explorer List on left side of window, and click “Set as StartUp Project”, then right click it again and click “Properties”, then open “Configuration Properties”, then click “Debugging”, and change the “Working Directory” to “[your drive letter]:/compile/viewer/indra/newview”.

Right-click on prepare in the Solution Explorer List on left side of window, and click “Project Only”  —> “Build Only prepare”.

This will download a list of “pre-built binaries” and extract them to a temp folder which are needed for the compile process. It might take 10-15 minutes for it to download all the pre-built binaries, but it will show in the “Output box” at the bottom of the window when it has completed this stage. (Once these files have been downloaded once, they are kept in the temp folder, so you don’t have to download them each time you want to compile a viewer)

Finally click “Build” menu then “Build Solution”, then wait for a while for the compiling to be done.

You will most likely see some warnings at start of the compile which can be ignored, and you will most likely see some errors in a similar format to this:

..\..\newview\llmanip.cpp(109) : error C2664: 'boost::signals::connection boost::signal1<R,T1,Combiner,Group,GroupCompare,SlotFunction>::connect(const boost::slot<SlotFunction> &,boost::signals::connect_position)': Convert parameter 1 from 'void (__cdecl *) (const LLSD &)' const in 'boost:: slot <SlotFunction> &' not possible
with
[
R=void,
T1=const LLSD &,
Combiner=boost::last_value<void>,
Group=int,
GroupCompare=std::less<S32>,
SlotFunction=boost::function<void (const LLSD &)>
]
and
[
SlotFunction=boost::function<void (const LLSD &)>
]
Cause: conversion from 'overloaded-function' in 'const boost:: slot <SlotFunction>' not possible
with
[
SlotFunction=boost::function<void (const LLSD &)>
]
Source type could be accepted by any constructor or the constructor overload resolution is ambiguous

These errors will cause the compile attempt to fail but are relatively easy to fix…^^.

To fix the above errors you will need to first find the files which are causing the errors in the compile history log, which will in this tutorials case be in “[your drive letter]:\compile\viewer\indra\newview” folder.

Then open the affected files one at a time and navigate down to the line in the code which caused the error (when you click the *.cpp files in your file manager they will open in “Visual C++ 2005 Express” and you can see the line numbers, so should be easy to find the error line).

In the case of the error above, the first error occurs on line 109 in “llmanip.cpp”, so find that line and you will see this code:

gSavedSettings.getControl(“PhoenixBuildPrefs_ActualRoot”)->getSignal()->connect(&updateActualRoot);

What will fix this line is adding the following into the line of code:

“(boost::function<void (const LLSD &)>) “

So the line will now look like this

gSavedSettings.getControl(“PhoenixBuildPrefs_ActualRoot”)->getSignal()->connect((boost::function<void (const LLSD &)>) &updateActualRoot);

(or to highlight it to show its position in the code better):

gSavedSettings.getControl(“PhoenixBuildPrefs_ActualRoot”)->getSignal()->connect((boost::function<void (const LLSD &)>) &updateActualRoot);

Basically on each line that has an “error C2664” put the code between  “getSignal()->connect(” and ” &updateActualRoot);”

Once you have fixed the “error C2664” lines, which, you might have about 17 of them to fix, click “Build” menu and then “Build Solution” again, and this time it should Compile sucessfully.

Hopefully it Compiled for you, then the next steps are to locate all the Viewer files and put them in a new folder:

Make a new folder somewhere, then copy the contents of your “/compile/viewer/indra/newview/build-vc80/release/*” into the new folder, but you dont need to copy “secondlife-bin.*” files apart from the .exe as the others arent needed to run the viewer.

Next copy the following folders from “/compile/viewer/indra/newview/” to your new folder:

  • app_settings
  • character
  • fonts
  • skins
  • all .txt files that include ‘feature’

Copy the following files from “/compile/viewer/indra/newview/” to your new folder:

  • “fmod.dll”
  • “dbghelp.dll”
  • gpu_table.txt

Go to your new folder and go to “llplugin” folder and copy the following files in there into the root of your new folder, (where the main Viewer program EXE file is), as they seemed to have done that with the Official Phoenix installation for some reason:

  • libeay32.dll
  • qtcore4.dll
  • qtgui4.dll
  • qtnetwork4.dll
  • qtopengl4.dll
  • qtwebkit4.dll
  • ssleay32.dll

Copy the following folder and files from “/compile/viewer/libraries/i686-win32/lib/release” folder to the “llplugin” folder which is in your new folder:

  • codecs
  • QtXmlPatterns4.dll (this file is needed to make SL Search and built in web-browser work)

Copy the following Licence TXT file from the “/compile/viewer/indra/newview/” folder to the new folder (just for the sake of legitimacy i guess):

  • licenses-win32.txt

When i compiled the viewer i couldnt find a compiled “OpenJPEG.dll” in the compiled folders, so i just copied the “OpenJPEG.dll” from the official Phoenix Viewer installation to my new folder.

There you have it…^^.

Hope this Page is of some use to those who want to compile an SL viewer from source-code.

2.xx based SL viewers have a few different steps to follow to compile them but try compiling a 1.xx based viewer first, then the info for 2.xx based viewers is on SL wiki. I might write a tutorial on how to compile those if i manage to do it myself, and currently i havent tried yet..;).

If you are feeling adventurous and plan to modify the viewer source-code which you download, then you should give the viewer a “Unique Viewer Channel” in the code, which LL checks as it logs on to SL, for more info about how to do that look at the bottom of this web-page: http://wiki.secondlife.com/wiki/Get_source_and_compile

These are some of the links I used to make this guide:

http://wiki.secondlife.com/wiki/Microsoft_Windows_Builds

http://imprudenceviewer.org/wiki/How_to_compile

http://wiki.secondlife.com/wiki/Microsoft_Visual_Studio

http://wiki.secondlife.com/wiki/Compiling_the_Viewer_%28MSVS2008%29

http://imprudenceviewer.org/forums/viewtopic.php?f=7&p=6381

Posted in Uncategorized | 4 Comments